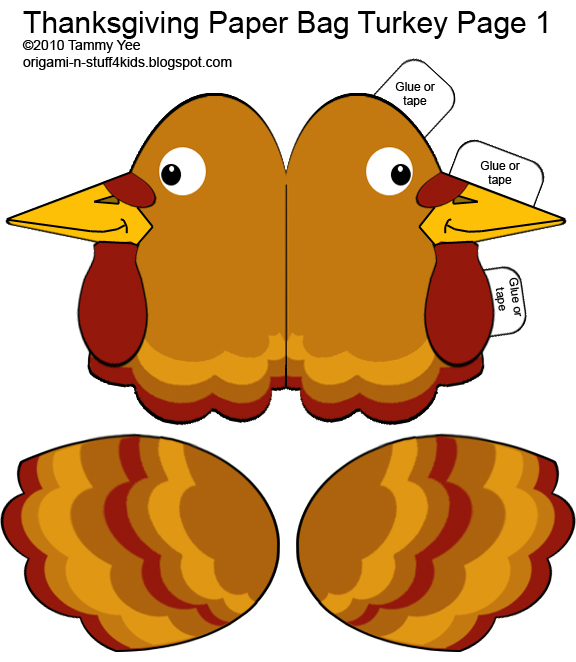
A fun and easy centerpiece children can make with a few supplies and these printable designs. Parental guidance needed.
Supplies:
1 small paper bag
scissors
glue or tape
marker
printed turkey template
Directions:
1. Stuff small paper bag with tissue paper or paper towels. Twist and seal end.
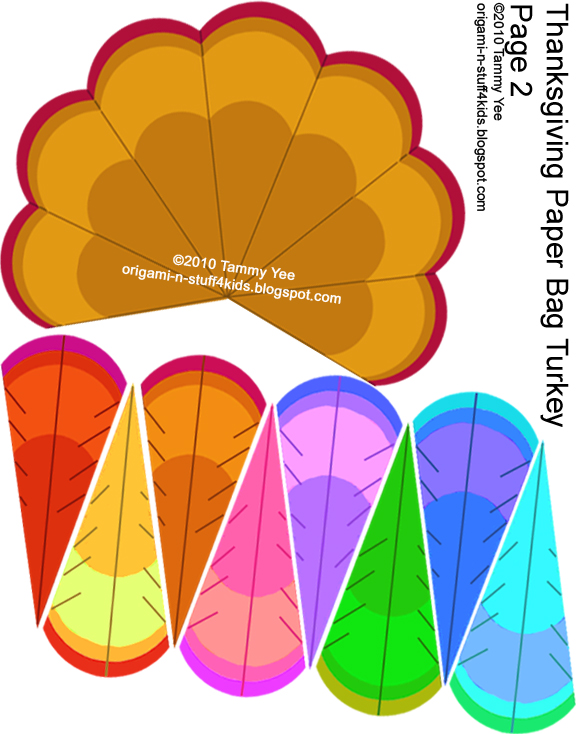
2. Print and cut out "Giving Thanks" Paper Bag Turkey Craft sheets (2 pages).
3. Assemble head by taping or gluing tabs, then cover sealed end of paper bag with paper turkey head and secure with tape or glue. (I cut a slit in the back of the head so that it fits more snugly against the paper bag body.)
4. Glue or tape turkey wings and tail to body.
5. Write down things that your children are thankful for--friends, family, health, etc.--on each feather and glue or tape onto turkey tail.
Happy Thanksgiving!
©2010 Tammy Yee
All rights reserved.
Add Post To: |
Digg|
Technorati|
Tip'd|
del.icio.us|
Stumbleupon|
Reddit|
BlinkList|
Furl|
Spurl|
Yahoo|
Simpy|
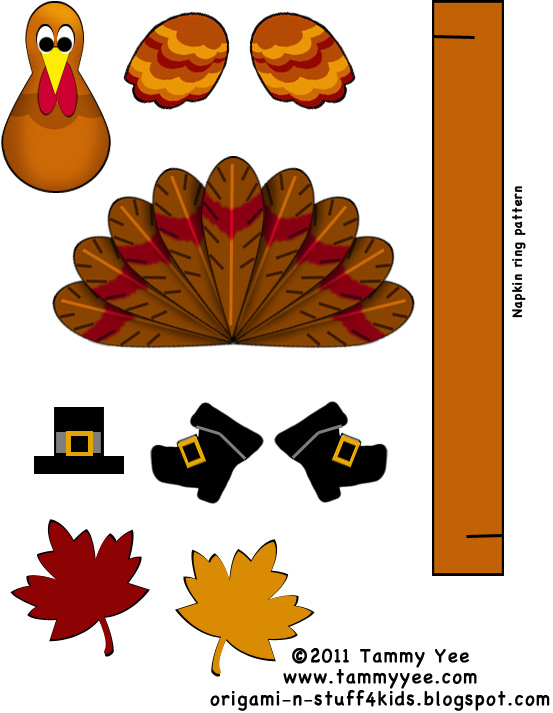
Here's a Thanksgiving Turkey to print for place cards, napkin rings and greeting cards. For place cards, use a 3"x5" blank index card, folded in half. For napkin rings, use a cardboard paper towel roll cut into 1" lengths, OR use the printed pattern. For Thanksgiving greeting cards, fold a blank letter-sized paper in half and decorate.
©2011 Tammy Yee
All rights reserved.
Add Post To: |
Digg|
Technorati|
Tip'd|
del.icio.us|
Stumbleupon|
Reddit|
BlinkList|
Furl|
Spurl|
Yahoo|
Simpy|
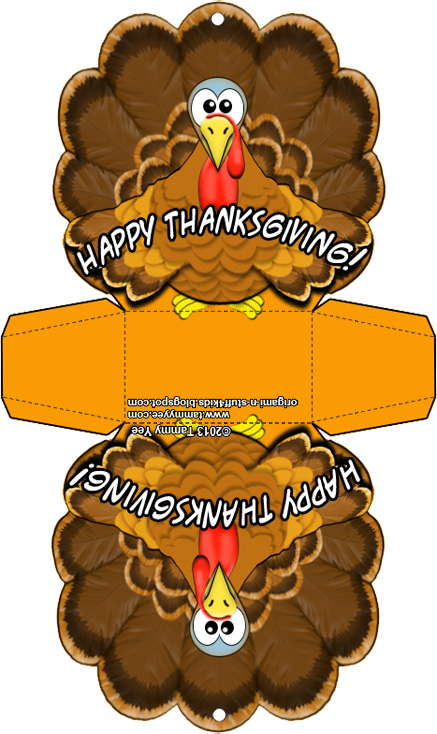
Print and fold a Thanksgiving Turkey Gift Bag.
Directions:
Print on hard card stock. Cut out on outer lines, fold on dashed lines and secure with glue or tape. Punch holes in top and add ribbon.
Happy Thanksgiving!
©2013 Tammy Yee
All rights reserved.
Add Post To: |
Digg|
Technorati|
Tip'd|
del.icio.us|
Stumbleupon|
Reddit|
BlinkList|
Furl|
Spurl|
Yahoo|
Simpy|
Print and fold an Origami Turkey for Thanksgiving.
Difficulty: Easy
Directions:
1a. Cut out image along outer solid lines.
1b. Fold up on diagonal line A. Unfold.
1c. Fold down on diagonal line B. Unfold.

2a. With printed side facing up, fold up on center line c. Unfold.
2b. With printed side facing down, repeat fold on center line c. Unfold.

3a. Fan-fold turkey's tail as shown.
3b. Fold up along center crease as shown.
3c. Fold head up along diagonal folds as shown. You may tape center of fanned tail and head if desired.

Your turkey is pau (finished)! Happy Thanksgiving!
©2009 Tammy Yee
All rights reserved.
Add Post To: |
Digg|
Technorati|
Tip'd|
del.icio.us|
Stumbleupon|
Reddit|
BlinkList|
Furl|
Spurl|
Yahoo|
Simpy|
Print and make a cornucopia for Thanksgiving by cutting along outer margin, then rolling into a cone. Secure with tape. Fill with treats as favors or add a label to create table place cards. Decorate with
Fall Cut Out Patterns.
Happy Thanksgiving!
©2011 Tammy Yee
All rights reserved.
Add Post To: |
Digg|
Technorati|
Tip'd|
del.icio.us|
Stumbleupon|
Reddit|
BlinkList|
Furl|
Spurl|
Yahoo|
Simpy|
Need tiny boxes for Holiday treats? Kids love helping with favors and decorations. Here's an activity you can work on together...printing and folding Holiday-themed boxes to hold candy kisses, peppermints and more...
Directions:
1a. Cut out box along outer solid line.
1b. Make cuts on the "shamrock halves" as shown, along the black lines only. Do not cut beyond the points indicated by the red dots.

2a - d. With printed side facing down, fold and unfold along the solid black lines as indicated, to form the sides of the box.
| 2e. Your box should be creased as shown: |  |
3a-c. Repeat the process along the outer lines to form the lid of the box.
| 3d. Your box should now be creased as shown: |  |
| 4a. Take note of the diagonal lines marked in red: |  |
4b. As you fold the sides of the box up as shown, you will make creases along these diagonal lines to form the corners of the box.
4c. Secure the box by interlocking the shamrock halves along the cuts you made in step 1b. |  |
Print St. Patrick's Day Box
Print Easter Chick Box
Print Halloween Box
©2009 Tammy Yee. All rights reserved.
Add Post To: |
Digg|
Technorati|
Tip'd|
del.icio.us|
Stumbleupon|
Reddit|
BlinkList|
Furl|
Spurl|
Yahoo|
Simpy|
An Easter Chick Box to print and fold...perfect for chocolate treats!
Difficulty: Easy
Directions: Follow directions for Shamrock Box.
Happy Easter!
©2010 Tammy Yee
All rights reserved.
Add Post To: |
Digg|
Technorati|
Tip'd|
del.icio.us|
Stumbleupon|
Reddit|
BlinkList|
Furl|
Spurl|
Yahoo|
Simpy|

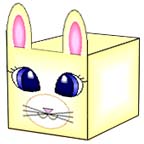
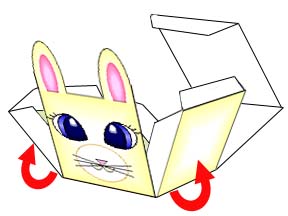
Here's another fun box, perfect for holding chocolate eggs.
This one was designed by my son, Cosmo, using an old program, AppleWorks.

Instructions:
1.
Print and cut out Bunny Box along outer solid line.
2. Fold along tabs and sides as shown.
3. Secure side tabs to inside of box with tape or glue.

Designed by Cosmo Custodio. Copyright ©2009 Tammy Yee. All rights reserved.
Add Post To: |
Digg|
Technorati|
Tip'd|
del.icio.us|
Stumbleupon|
Reddit|
BlinkList|
Furl|
Spurl|
Yahoo|
Simpy|
Great for Easter favors, fun for tots to decorate!
Difficulty: Easy
Directions:
- Print and cut out Easter Basket, Basket Handle, and Decorations.
- Fold and assemble Basket along solid black lines. Tape or glue tabs.
- Attach Basket Handle, to desired length, with tape or glue.
- Decorate with Bunny, Eggs and Heart.
©2010 Tammy Yee
All rights reserved.
Add Post To: |
Digg|
Technorati|
Tip'd|
del.icio.us|
Stumbleupon|
Reddit|
BlinkList|
Furl|
Spurl|
Yahoo|
Simpy|
Copyright ©2009 Tammy Yee
All rights reserved. No portion of this web site may be reproduced without prior written consent.


