With its distinctive orange and black markings, the
monarch butterfly is the most famous of North American butterflies, best
known for its long migrations.
No single butterfly
survives the journey. Instead, it takes four generations of butterflies
to travel south to southern California and Mexico to winter in warmer
climates. There, they roost by the thousands, sometimes covering trees.
In the spring, they begin the long migration back up to the United
States and Canada.
The monarch butterfly is the official state butterfly of
Alabama, Minnesota, Vermont and West Virginia.
Print and Fold a Monarch Butterfly Origami:


Difficulty: Easy
Directions: Follow the same directions as below.
1a.
Print and cut out image along outer solid lines.
2a. With printed side facing down,
2b. Fold in half along diagonal line.
2c. Unfold and repeat the diagonal fold on other side.
3a. With printed side facing up,
3b. Fold in half along horizontal line.
3c. Unfold. Your paper should be creased as illustrated.
4. Carefully fold along creases, forming a "tent" as illustrated.
5a. Fold the right "tent" corner up along line A, as illustrated.
5b. Fold the left "tent" corner up along line B, as illustrated.
6a. Turn butterfly over, printed side down.
6b. Fold down along line C.
6c. Pinch or crease in center as illustrated.

Your monarch butterfly is ready to fly!
©2010 Tammy Yee
All rights reserved.
Add Post To: |
Digg|
Technorati|
Tip'd|
del.icio.us|
Stumbleupon|
Reddit|
BlinkList|
Furl|
Spurl|
Yahoo|
Simpy|
Print and fold Rudolph the Red-Nosed Reindeer for Christmas.
Difficulty: Easy
Directions:
Print and cut out reindeer origami along outer solid line.
1. Fold origami in half along red horizontal line, as shown. Unfold.
2. Fold origami back along diagonal line as shown. Unfold. Repeat on other side. Unfold.
3. Your origami should be creased as illustrated by red lines. Carefully fold origami along these creases to form an upside-down "tent."

4. Turn your origami over, with Rudolph's face facing down. Fold each corner down, along diagonal lines, as shown.
5. Fold corner toward center, along vertical line, as shown. Repeat on other side.
6. Note diagonal lines marked in red. Fan fold antlers and ears in on both sides, as shown.

©2009 Tammy Yee
All rights reserved.
Add Post To: |
Digg|
Technorati|
Tip'd|
del.icio.us|
Stumbleupon|
Reddit|
BlinkList|
Furl|
Spurl|
Yahoo|
Simpy|
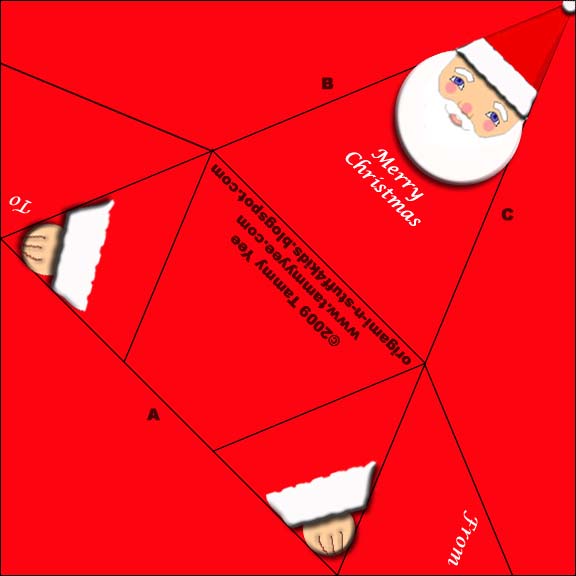
Print and fold an Origami Santa to use as a gift tag or a Christmas card.
Difficulty: Easy
Directions:
1.
Print and cut out Origami Santa along outer solid lines.

2a. With printed side facing down, fold up on line A.
2b. Fold diagonally on line B.
2c. Repeat diagonal fold on line C.
2d. Fold Santa's body up as shown.
3a. Turn Origami Santa over, with printed side facing up.
3b. Fold Santa's arm down as shown.
3c. Repeat on other side, and your Origami Santa is finished!
Merry Christmas!
©2009 Tammy Yee
All rights reserved.
Add Post To: |
Digg|
Technorati|
Tip'd|
del.icio.us|
Stumbleupon|
Reddit|
BlinkList|
Furl|
Spurl|
Yahoo|
Simpy|
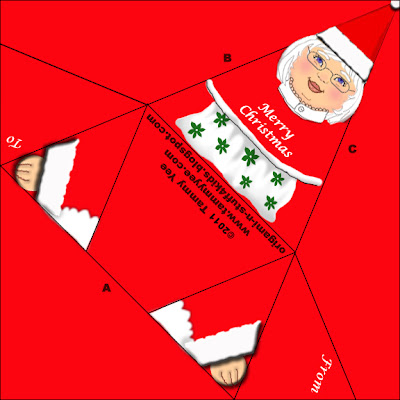
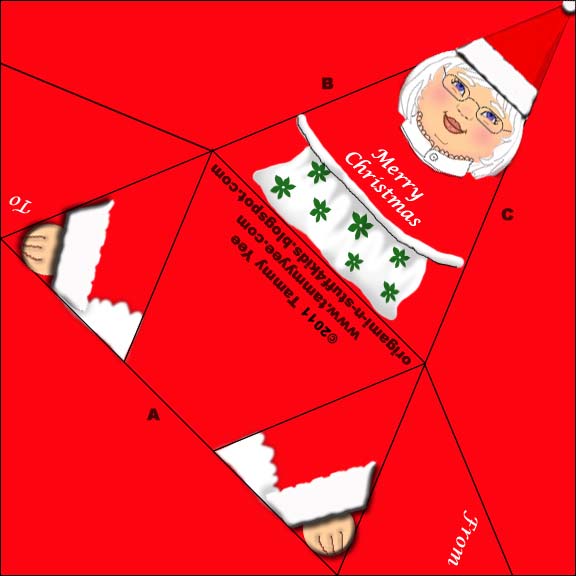
Print and fold an Origami Mrs. Claus to use as a gift tag or a Christmas card.
Difficulty: Easy
Directions: Follow the same instructions used for Santa Claus Gift Tag:
1.
Print and cut out Origami Mrs. Claus along outer solid lines.
2a. With printed side facing down, fold up on line A.
2b. Fold diagonally on line B.
2c. Repeat diagonal fold on line C.
2d. Fold Mrs. Claus's body up as shown.
3a. Turn Origami Mrs. Santa Claus over, with printed side facing up.
3b. Fold Mrs. Claus's arm down as shown.
3c. Repeat on other side, and your Origami Mrs. Claus is finished!
©2011 Tammy Yee
All rights reserved.
Add Post To: |
Digg|
Technorati|
Tip'd|
del.icio.us|
Stumbleupon|
Reddit|
BlinkList|
Furl|
Spurl|
Yahoo|
Simpy|
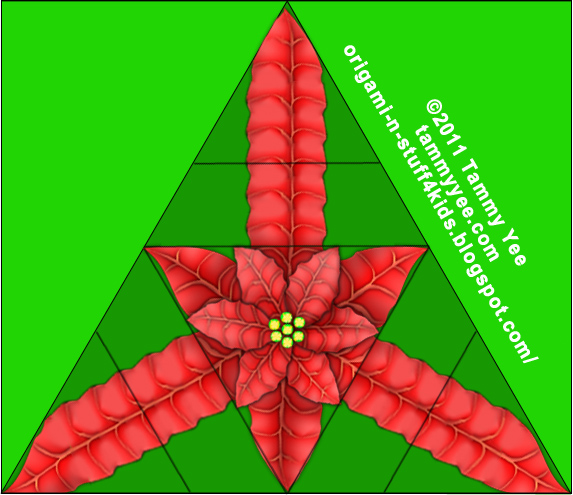
Print and fold an Origami Poinsettia for Christmas! Great for home-made crafts, cards, gift tags and Christmas tree decorations.
Directions:
1.
Print and cut out Christmas Origami Poinsettia pattern.
2. With
printed side facing down, fold diagonally as shown.
3. Repeat diagonal fold on opposite side, as shown.
4
. Fold upper corner of Origami Poinsettia down, as shown.
5. Fold corner up, as shown, to create poinsettia petal.
6. Repeat on right corner...
7. And repeat on left corner...
8. Turn over...your Origami Poinsettia is finished! Merry Christmas!
©2011 Tammy Yee
All rights reserved.
Add Post To: |
Digg|
Technorati|
Tip'd|
del.icio.us|
Stumbleupon|
Reddit|
BlinkList|
Furl|
Spurl|
Yahoo|
Simpy|
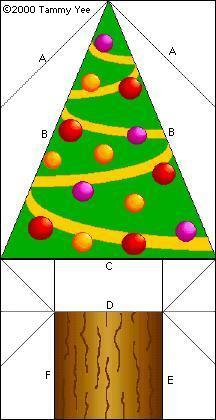
Print and Fold an Origami Christmas Tree for the Holidays!
Difficulty: Easy to Moderate
Directions:
Print Christmas Tree Origami.
1a. Cut out image along outer solid lines.
1b. Turn over so that printed side is facing down.
2a. Fold corners down along diagonal lines labeled "A".
2b. Fold down on diagonal lines labeled "B" as shown.
2c. Fold tree trunk up along line "C",
2d. Then down along "D".

3a. Fold along vertical line "E".
3b. Unfold and carefully form a "tent" along the diagonal lines as shown.
3c. Repeat on the other side, folding along vertical line "F",
3d. And folding a "tent" to form the tree trunk.
Your Christmas Tree is pau (finished)! Merry Christmas!

©2009 Tammy Yee
All rights reserved.
Add Post To: |
Digg|
Technorati|
Tip'd|
del.icio.us|
Stumbleupon|
Reddit|
BlinkList|
Furl|
Spurl|
Yahoo|
Simpy|
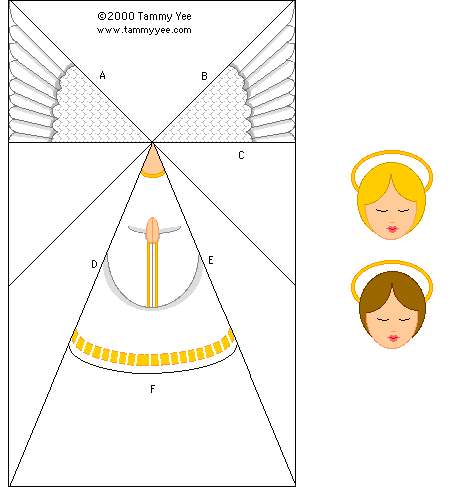
Print and Fold an Origami Angel for Christmas!
Difficulty: Easy
Directions:
Print Origami Angel.
1a. Cut out angel faces along outer solid line (you have two to choose from).
1b. Cut out angel body along outer solid line.
1c. Turn angel body over so that printed side is facing down.
2a. Crease along diagonal line "A". Unfold.
2b. Crease along diagonal line "B" as shown. Unfold.
2c. Turn paper over so that printed side faces up.
2d. Crease down along horizontal line "C". Unfold.
3a. Carefully fold back along creased lines to form a "tent" as shown.
3b. Fold angel's robe back along line "D".
3c. Fold angel's robe back along line "E". Your angel's wings should be visible behind robes, as shown.
4a. Trim bottom of angel's robes along line "F".
4b. Dab a spot of glue on angel's neck (or you may use tape).
4c. Attach angel's face and your Christmas Angel is pau (finished)! Mele Kalikimaka!

Merry Christmas!
©2009 Tammy Yee
All rights reserved.
Add Post To: |
Digg|
Technorati|
Tip'd|
del.icio.us|
Stumbleupon|
Reddit|
BlinkList|
Furl|
Spurl|
Yahoo|
Simpy|
Copyright ©2009 Tammy Yee
All rights reserved. No portion of this web site may be reproduced without prior written consent.


