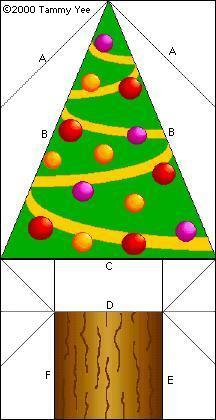
Print and Fold an Origami Christmas Tree for the Holidays!
Difficulty: Easy to Moderate
Directions:
Print Christmas Tree Origami.
1a. Cut out image along outer solid lines.
1b. Turn over so that printed side is facing down.
2a. Fold corners down along diagonal lines labeled "A".
2b. Fold down on diagonal lines labeled "B" as shown.
2c. Fold tree trunk up along line "C",
2d. Then down along "D".

3a. Fold along vertical line "E".
3b. Unfold and carefully form a "tent" along the diagonal lines as shown.
3c. Repeat on the other side, folding along vertical line "F",
3d. And folding a "tent" to form the tree trunk.
Your Christmas Tree is pau (finished)! Merry Christmas!

©2009 Tammy Yee
All rights reserved.
Add Post To: |
Digg|
Technorati|
Tip'd|
del.icio.us|
Stumbleupon|
Reddit|
BlinkList|
Furl|
Spurl|
Yahoo|
Simpy|
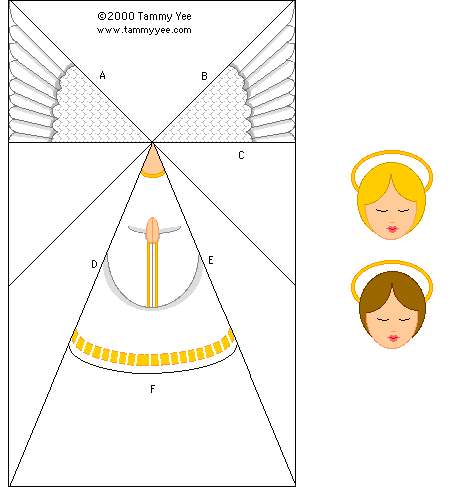
Print and Fold an Origami Angel for Christmas!
Difficulty: Easy
Directions:
Print Origami Angel.
1a. Cut out angel faces along outer solid line (you have two to choose from).
1b. Cut out angel body along outer solid line.
1c. Turn angel body over so that printed side is facing down.
2a. Crease along diagonal line "A". Unfold.
2b. Crease along diagonal line "B" as shown. Unfold.
2c. Turn paper over so that printed side faces up.
2d. Crease down along horizontal line "C". Unfold.
3a. Carefully fold back along creased lines to form a "tent" as shown.
3b. Fold angel's robe back along line "D".
3c. Fold angel's robe back along line "E". Your angel's wings should be visible behind robes, as shown.
4a. Trim bottom of angel's robes along line "F".
4b. Dab a spot of glue on angel's neck (or you may use tape).
4c. Attach angel's face and your Christmas Angel is pau (finished)! Mele Kalikimaka!

Merry Christmas!
©2009 Tammy Yee
All rights reserved.
Add Post To: |
Digg|
Technorati|
Tip'd|
del.icio.us|
Stumbleupon|
Reddit|
BlinkList|
Furl|
Spurl|
Yahoo|
Simpy|
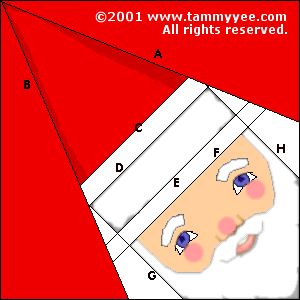
Print and Fold and Origami Santa for Christmas!
Difficulty: Easy
Directions:
Print Santa Origami.
1a. Cut out image along outer solid lines.
1b. Turn over so that printed side is facing
down. Fold diagonally along line
A.
1c. Repeat diagonal fold along line
B.
2a. Turn Santa over so that the printed side is facing
up. Take careful note of the lines as labeled.
2b. Fold forward on horizontal line "C" as shown.
2c. Fold back along horizontal line "D" as shown.
3a. Fold back along horizontal line "E".
3b. Fold forward along horizontal line "F".
3c. Fold back along vertical line "G",
3d. Then fold back along vertical line "H". Your Santa origami is pau (finished)! Merry Christmas!
©2009 Tammy Yee
All rights reserved.
Add Post To: |
Digg|
Technorati|
Tip'd|
del.icio.us|
Stumbleupon|
Reddit|
BlinkList|
Furl|
Spurl|
Yahoo|
Simpy|
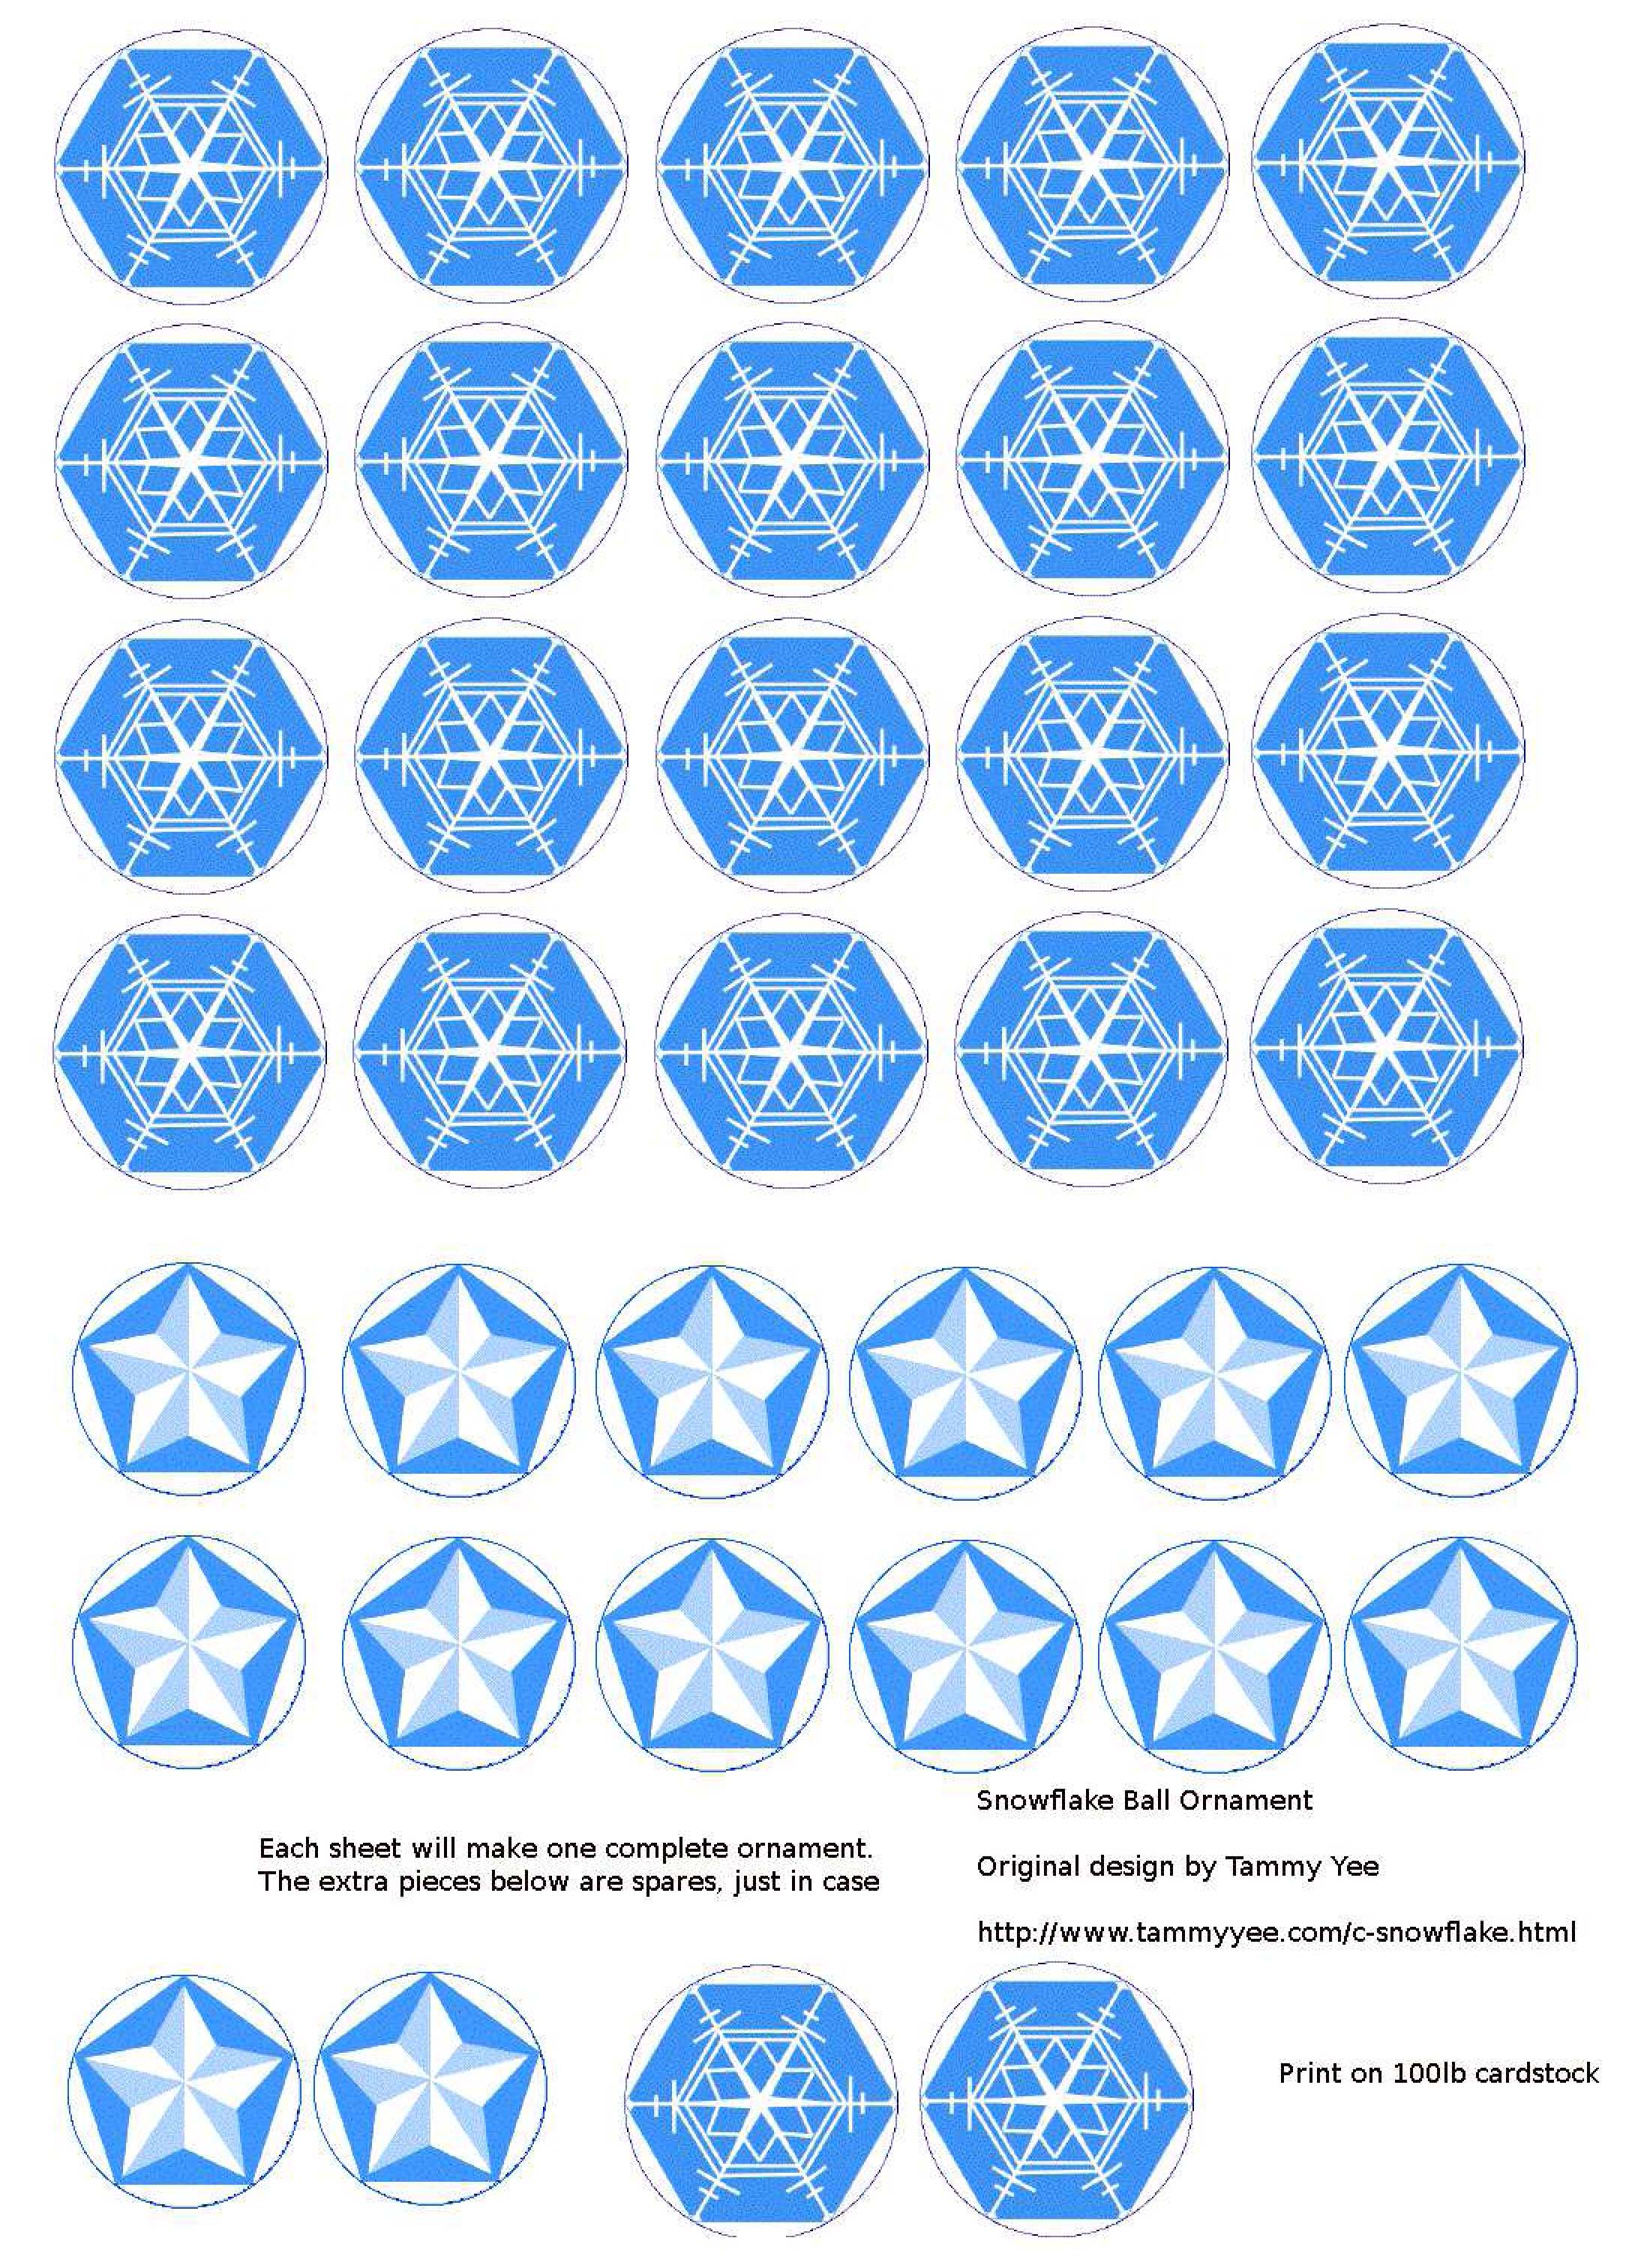
Assemble this geometric Christmas Ornament using pre-printed pentagons and hexagons.
Difficulty: Moderate
Directions:
1. Print out Snowflake Ornament pattern sheet, preferable on heavy weight or cardstock paper.
2.
Cut out hexagons and pentagons along solid, outer circle.
3a.
Prepare your pentagons by folding the white "tabs" forward as shown. Repeat on all five sides of the pentagon.
3b. Prepare your hexagons in the same manner, creating tabs by folding the white edges forward along all six sides (not shown).
4. Assemble your Christmas ornament by gluing the white tabs together, or taping the shapes together on the underside. Each pentagon should be surrounded by five hexagons. Refer to illustration of completed ornament at the top of page as needed.
©2009 Tammy Yee
All rights reserved.
Add Post To: |
Digg|
Technorati|
Tip'd|
del.icio.us|
Stumbleupon|
Reddit|
BlinkList|
Furl|
Spurl|
Yahoo|
Simpy|
Here are some Hawaiian Christmas greetings to post on websites or email to friends.
Mele Kalikimaka! (Merry Christmas)
©2009 Tammy Yee
All rights reserved.
Add Post To: |
Digg|
Technorati|
Tip'd|
del.icio.us|
Stumbleupon|
Reddit|
BlinkList|
Furl|
Spurl|
Yahoo|
Simpy|
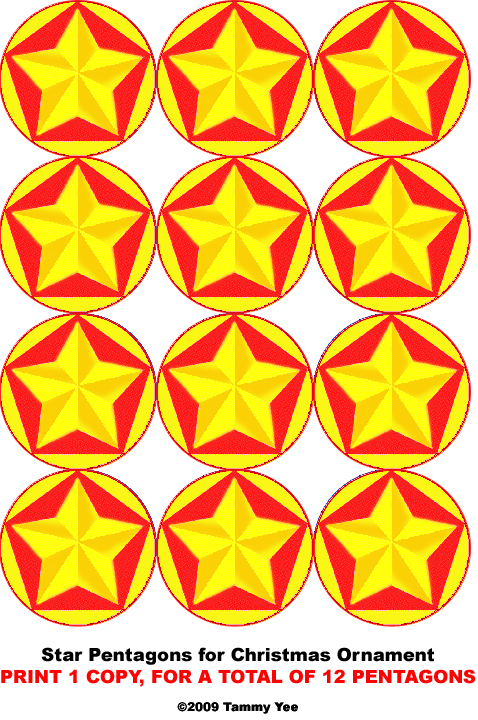
Assemble this geometric Christmas Ornament using pre-printed pentagons.
Difficulty: Moderate
Materials:
12 (1 copy) Star Pentagons
Tape or glue
Directions:
2. Cut out pentagons along solid, outer circle.
3. Prepare your pentagons by folding the white "tabs" forward as shown. Repeat on all five sides of the pentagon.
4a. Assemble your Christmas ornament by gluing the white tabs together, or taping the shapes together on the underside, so that you have half an ornament with a pentagon in the center, surrounded by five pentagons.
4b. Repeat, to make the second half of the ornament, with a pentagon in the center surrounded by five pentagons.
4c. Glue or tape the two halves together to create your Christmas Star Ornament. Refer to photo of completed ornament at the top of the page as needed.
Add Post To: |
Digg|
Technorati|
Tip'd|
del.icio.us|
Stumbleupon|
Reddit|
BlinkList|
Furl|
Spurl|
Yahoo|
Simpy|
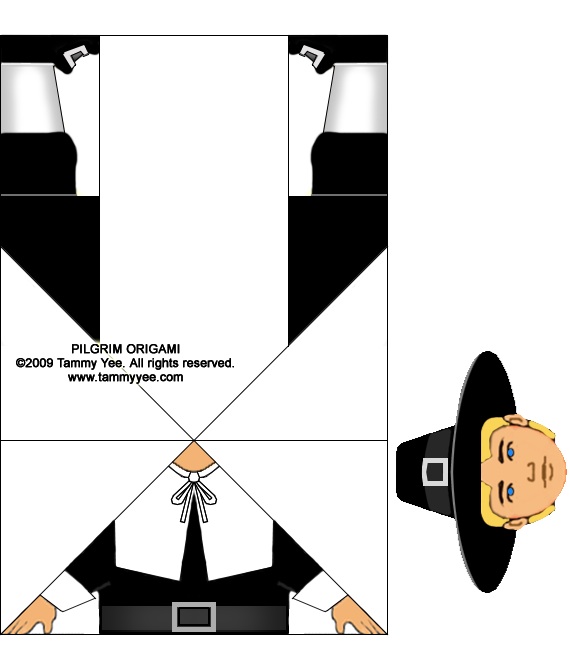
Print and fold an Origami Pilgrim Boy or Girl. Craft idea: Glue onto folded card stock to create your own Thanksgiving cards.
Difficulty: Easy
Directions: Follow the same directions used for the Cinco De Mayo Boy Origami:
1a.
Print and cut out doll face along outer solid line.
1b. Cut out Pilgrim doll body along outer solid line.
1c. Turn doll body over so that the printed side is facing
down.

2a. Crease along diagonal line as shown. Unfold.
2b. Repeat crease along diagonal line on other side, as shown. Unfold.
2c. Turn origami over so that the printed side faces
up.
2d. Crease down along horizontal line as shown. Unfold.

3a. With printed side facing
down, carefully "tent" fold upper body forward, as shown.
3b. Fold doll's legs
forward, as shown.
3c. Repeat on other side.

4a. Glue head onto body.
4b. Your Pilgrim Origami is finished!

Happy Thanksgiving!
©2009 Tammy Yee. All rights reserved. May not be reproduced or altered without consent.
Add Post To: |
Digg|
Technorati|
Tip'd|
del.icio.us|
Stumbleupon|
Reddit|
BlinkList|
Furl|
Spurl|
Yahoo|
Simpy|
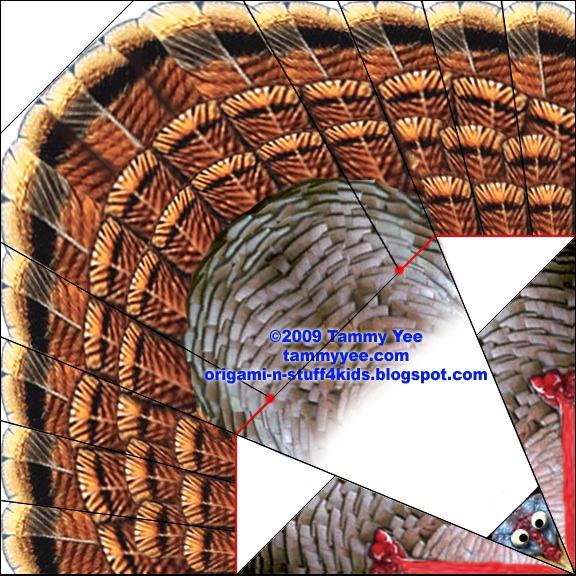
Fold an Origami Thanksgiving Turkey and make a card to wish a Happy Thanksgiving to a loved one.
Difficulty: Easy to Moderate
Directions:
1a.
Print Turkey Origami.
1b.
Print Happy Thanksgiving Card, preferably on card stock or heavy paper.
2a. Cut out Turkey Origami.
2b. Cut along
bold red lines, as shown by
red arrows.
2c. Fold turkey tail feather
back, as shown by
blue arrow.
3. Accordion fold tail feathers, back and forth, as shown.
4. Repeat accordion folds on other side.
5. Fold body up as shown.
6a. Fold turkey body forward to center, as shown.
6b. Repeat on other side.
7. Fold turkey's head
down, as shown.
8a. Fold corners of turkey body back, as shown.
8b. Fold top of tail back, as shown.
9a. Grasping tip of tail, pull down to open accordion pleats, as shown.
9b. Repeat on other side.
10. Fold bottom of body back, as shown, then glue onto Happy Thanksgiving Day card.
Happy Thanksgiving!
©2009 Tammy Yee
All rights reserved.
Add Post To: |
Digg|
Technorati|
Tip'd|
del.icio.us|
Stumbleupon|
Reddit|
BlinkList|
Furl|
Spurl|
Yahoo|
Simpy|
Copyright ©2009 Tammy Yee
All rights reserved. No portion of this web site may be reproduced without prior written consent.


