Print and fold Rudolph the Red-Nosed Reindeer for Christmas.
Difficulty: Easy
Directions:
Print and cut out reindeer origami along outer solid line.
1. Fold origami in half along red horizontal line, as shown. Unfold.
2. Fold origami back along diagonal line as shown. Unfold. Repeat on other side. Unfold.
3. Your origami should be creased as illustrated by red lines. Carefully fold origami along these creases to form an upside-down "tent."

4. Turn your origami over, with Rudolph's face facing down. Fold each corner down, along diagonal lines, as shown.
5. Fold corner toward center, along vertical line, as shown. Repeat on other side.
6. Note diagonal lines marked in red. Fan fold antlers and ears in on both sides, as shown.

©2009 Tammy Yee
All rights reserved.
Add Post To: |
Digg|
Technorati|
Tip'd|
del.icio.us|
Stumbleupon|
Reddit|
BlinkList|
Furl|
Spurl|
Yahoo|
Simpy|
Print and assemble a snowflake star for Christmas...hang in your window or use as a treetop ornament. Assembled size: app. 14 inches
DIRECTIONS:
1.
Print 5 copies of Star Snowflake Ornament Section on cardstock paper:
2. Cut out pattern.
3. Fold along solid lines and tab lines. Here I used a ruler and a butter knife to score the lines, to create crisp folds.
4. Each snowflake section be creased as shown. Note how all the folds are toward the blank surface of the pattern.
5. Tape or glue each section along the tab as shown.
Double stick tape works best, since there's no mess and no waiting for it to dry.
6. Once the star sections have been assembled, flatten each section as shown.
7. Align 2 sections and secure the tabs as shown.
8. Repeat with all five sections.
9. Carefully open your star like a fan, and secure the final two tabs.
Merry Christmas!
©2013 Tammy Yee.
Add Post To: |
Digg|
Technorati|
Tip'd|
del.icio.us|
Stumbleupon|
Reddit|
BlinkList|
Furl|
Spurl|
Yahoo|
Simpy|
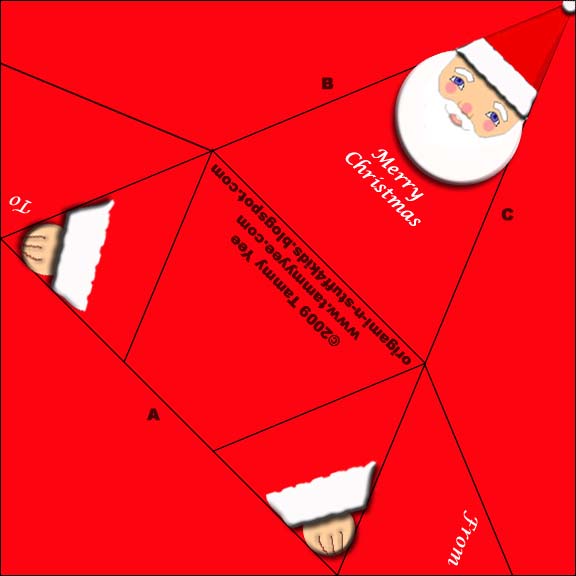
Print and fold an Origami Santa to use as a gift tag or a Christmas card.
Difficulty: Easy
Directions:
1.
Print and cut out Origami Santa along outer solid lines.

2a. With printed side facing down, fold up on line A.
2b. Fold diagonally on line B.
2c. Repeat diagonal fold on line C.
2d. Fold Santa's body up as shown.
3a. Turn Origami Santa over, with printed side facing up.
3b. Fold Santa's arm down as shown.
3c. Repeat on other side, and your Origami Santa is finished!
Merry Christmas!
©2009 Tammy Yee
All rights reserved.
Add Post To: |
Digg|
Technorati|
Tip'd|
del.icio.us|
Stumbleupon|
Reddit|
BlinkList|
Furl|
Spurl|
Yahoo|
Simpy|
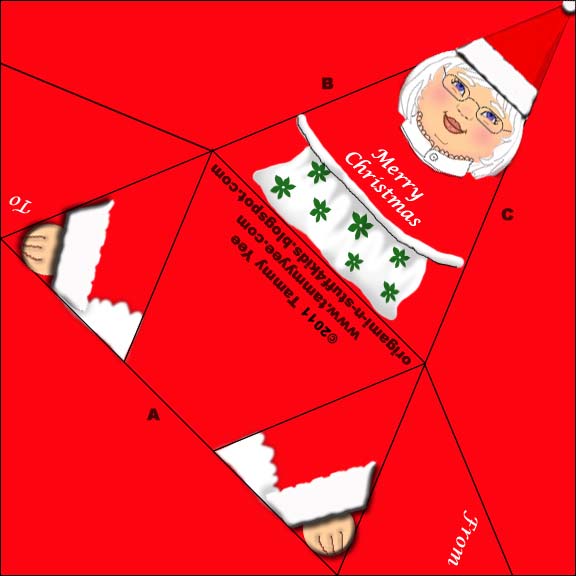
Print and fold an Origami Mrs. Claus to use as a gift tag or a Christmas card.
Difficulty: Easy
Directions: Follow the same instructions used for Santa Claus Gift Tag:
1.
Print and cut out Origami Mrs. Claus along outer solid lines.
2a. With printed side facing down, fold up on line A.
2b. Fold diagonally on line B.
2c. Repeat diagonal fold on line C.
2d. Fold Mrs. Claus's body up as shown.
3a. Turn Origami Mrs. Santa Claus over, with printed side facing up.
3b. Fold Mrs. Claus's arm down as shown.
3c. Repeat on other side, and your Origami Mrs. Claus is finished!
©2011 Tammy Yee
All rights reserved.
Add Post To: |
Digg|
Technorati|
Tip'd|
del.icio.us|
Stumbleupon|
Reddit|
BlinkList|
Furl|
Spurl|
Yahoo|
Simpy|
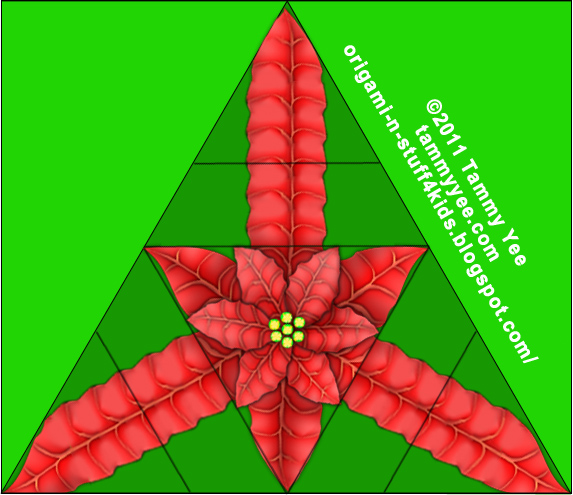
Print and fold an Origami Poinsettia for Christmas! Great for home-made crafts, cards, gift tags and Christmas tree decorations.
Directions:
1.
Print and cut out Christmas Origami Poinsettia pattern.
2. With
printed side facing down, fold diagonally as shown.
3. Repeat diagonal fold on opposite side, as shown.
4
. Fold upper corner of Origami Poinsettia down, as shown.
5. Fold corner up, as shown, to create poinsettia petal.
6. Repeat on right corner...
7. And repeat on left corner...
8. Turn over...your Origami Poinsettia is finished! Merry Christmas!
©2011 Tammy Yee
All rights reserved.
Add Post To: |
Digg|
Technorati|
Tip'd|
del.icio.us|
Stumbleupon|
Reddit|
BlinkList|
Furl|
Spurl|
Yahoo|
Simpy|
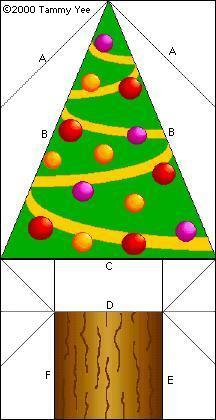
Print and Fold an Origami Christmas Tree for the Holidays!
Difficulty: Easy to Moderate
Directions:
Print Christmas Tree Origami.
1a. Cut out image along outer solid lines.
1b. Turn over so that printed side is facing down.
2a. Fold corners down along diagonal lines labeled "A".
2b. Fold down on diagonal lines labeled "B" as shown.
2c. Fold tree trunk up along line "C",
2d. Then down along "D".

3a. Fold along vertical line "E".
3b. Unfold and carefully form a "tent" along the diagonal lines as shown.
3c. Repeat on the other side, folding along vertical line "F",
3d. And folding a "tent" to form the tree trunk.
Your Christmas Tree is pau (finished)! Merry Christmas!

©2009 Tammy Yee
All rights reserved.
Add Post To: |
Digg|
Technorati|
Tip'd|
del.icio.us|
Stumbleupon|
Reddit|
BlinkList|
Furl|
Spurl|
Yahoo|
Simpy|
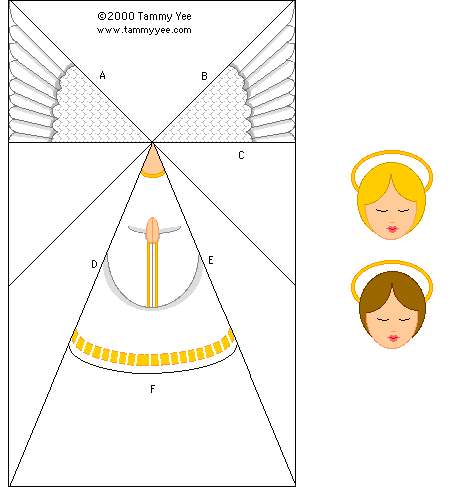
Print and Fold an Origami Angel for Christmas!
Difficulty: Easy
Directions:
Print Origami Angel.
1a. Cut out angel faces along outer solid line (you have two to choose from).
1b. Cut out angel body along outer solid line.
1c. Turn angel body over so that printed side is facing down.
2a. Crease along diagonal line "A". Unfold.
2b. Crease along diagonal line "B" as shown. Unfold.
2c. Turn paper over so that printed side faces up.
2d. Crease down along horizontal line "C". Unfold.
3a. Carefully fold back along creased lines to form a "tent" as shown.
3b. Fold angel's robe back along line "D".
3c. Fold angel's robe back along line "E". Your angel's wings should be visible behind robes, as shown.
4a. Trim bottom of angel's robes along line "F".
4b. Dab a spot of glue on angel's neck (or you may use tape).
4c. Attach angel's face and your Christmas Angel is pau (finished)! Mele Kalikimaka!

Merry Christmas!
©2009 Tammy Yee
All rights reserved.
Add Post To: |
Digg|
Technorati|
Tip'd|
del.icio.us|
Stumbleupon|
Reddit|
BlinkList|
Furl|
Spurl|
Yahoo|
Simpy|
Copyright ©2009 Tammy Yee
All rights reserved. No portion of this web site may be reproduced without prior written consent.


