Easy Butterfly Origami

My new book, Easy Butterfly Origami features 30 bold full-color patterns designed to accurately portray the dorsal and ventral sides of some of the most beautiful butterflies from around the world!

Origami Folding Tips

Origami, from the Japanese ori (to fold) and kami (paper), began in the 6th century when Buddhist monks introduced paper to Japan. The print-and-fold crafts and easy diagrams are designed to help children with fine motor skills, directions and hand eye coordination. Some basic origami folding tips:
  • Print and cut out patterns carefully.
  • Fold with clean, dry hands.
  • Follow the instructions. Study the diagrams and be patient.
  • Be precise: fold each crease well, flattening the creases by running your fingertip over the fold.
  • Folding the paper away from you is easier than folding towards you.
  • Be creative...use your origami on greeting cards, holiday decorations, table place cards and bookmarks.
Showing posts with label animals. Show all posts

Vampire Bat Origami

Print and fold a Vampire Bat for Halloween!


 1. Print and cut out Vampire Bat Origami.


 2. With printed side facing down, fold in half along diagonal line, as shown.
3. Fold down along Line A as shown.
4. Fold up along Line B as shown.
5. Fold down along Line C as shown, to reveal bat's head.
6. Fold wing back along diagonal line as shown, to reveal bat's ear, as shown.

7. Fold wing forward along diagonal line. You should be able to see both the bat's ear and its arm.


8. Repeat on other side.

9. Crease back and forth along bat's fingers to create "accordion folds" as shown.

10. Your Vampire Bat Origami is ready to fly!


©2011 Tammy Yee. All rights reserved. May not be reproduced without permission.


SWARMING DADDY LONGLEGS! The explanation behind the creepy phenomenon

So, fellow nerds, what's with this video circulating on Facebook and Youtube?


First of all, these are not spiders. They are harvestmen or daddy-longlegs. For those of you who remember the ol' mnemonic device for taxonomy, King Philip Can Order Fresh Green Salad (Kingdom, Phylum, Class, Order, Family, Genus and Species), these critters, like spiders, scorpions and ticks, are in the class Arachnida. However, harvestmen belong to their own order, Opiliones.

So what's the difference?
  1. Harvestmen have a single cephalothorax and a single pair of eyes. True spiders have a narrow "waist" that creates two segments, the cephalothorax and abdomen.
  2. Harvestmen have a single pair of eyes. True spiders most commonly have eight eyes, however they can have no eyes, or as many as 12 eyes.
  3. Harvestmen are nonvenomous.
  4. Harvestmen have no spinnerets, so they do not spin webs.
  5. Harvestmen are older than spiders--the oldest fossil, from Scotland, is at least 400 million years old. True spiders are about 300 million years old.
  6. Harvestmen are omnivores--they eat dead stuff, bird droppings, fungus and small arthropods and slugs.
Finally, the question every one is asking. WHY DO THEY DO THIS? They mass for defensive purposes, and to keep themselves warm. Harvestmen possess a pair of stinky glands called ozopores; when they mass, the combined smell can be quite disturbing. Swarming also makes them appear larger. When disturbed, the entire throng will sometimes bob and sway--a truly unsettling effect.

Learn more about harvestmen/daddy long legs:

http://spiders.ucr.edu/daddylonglegs.html

http://www.newsweek.com/video-science-explains-why-thousands-daddy-longlegs-swarmed-house-312362

http://mentalfloss.com/article/59455/15-fascinating-facts-about-daddy-longlegs

Wild Turkey Origami

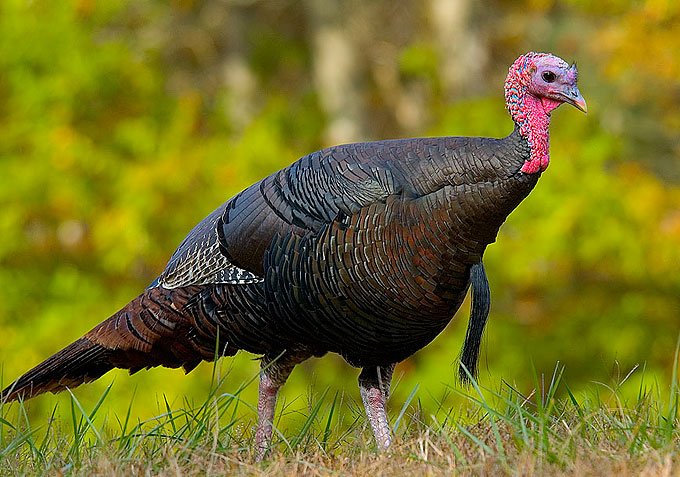
Eastern wild turkey. Photo by Dimus.
The wild turkey, the largest and heaviest of all gamefowls, is native to North America and ithe official state bird of Alabama and Massachusetts.

The Eastern wild turkey is found in woodlands and savannas throughout the eastern U.S. and up into Canada, where they scrounge on forest floors and through grasslands for nuts, seeds, fruits, insects and salamanders. They were a favored food of Native Americans, and the first turkey encountered by the Puritans.

Turkeys, with their distinctive red wattles (males only), fanned tails and gobbling, have become so much a part of our national heritage and our traditional celebrations that's it hard to imagine an America without them. Yet, by the early part of the 20th century, hunting and the loss of woodland forests threatened to wipe them out. Fortunately, with intensive wild turkey reintroduction programs to relocate the birds to their native habitats, wild turkeys are here to stay.

Fun Fact:
Benjamin Franklin preferred the wild turkey as the national bird:
"For my own part I wish the Bald Eagle had not been chosen the Representative of our Country. He is a Bird of bad moral character. He does not get his Living honestly. You may have seen him perched on some dead Tree near the River, where, too lazy to fish for himself, he watches the Labour of the Fishing Hawk; and when that diligent Bird has at length taken a Fish, and is bearing it to his Nest for the Support of his Mate and young Ones, the Bald Eagle pursues him and takes it from him...

With all this Injustice, he is never in good Case but like those among Men who live by Sharping & Robbing he is generally poor and often very lousy. Besides he is a rank Coward... 


I am on this account not displeased that the Figure is not known as a Bald Eagle, but looks more like a Turkey. For the Truth the Turkey is in Comparison a much more respectable Bird, and withal a true original Native of America... He is besides, though a little vain & silly, a Bird of Courage, and would not hesitate to attack a Grenadier of the British Guards who should presume to invade his Farm Yard with a red Coat on."


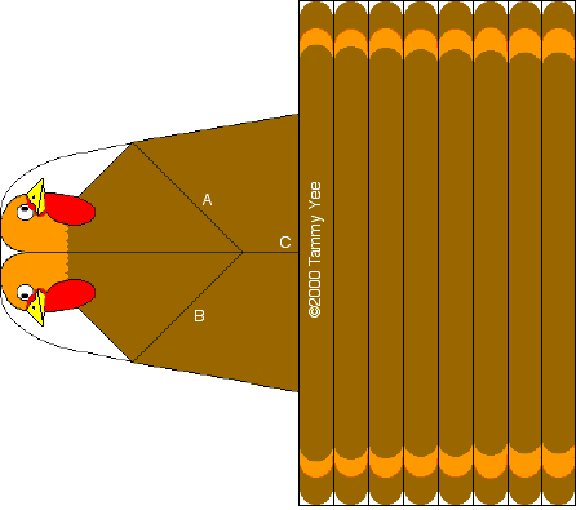
Print and fold a Turkey origami.


Difficulty: Easy to Moderate


Directions:


1a. Print Turkey Origami.


2a. Cut out Turkey Origami.
2b. Cut along bold red lines, as shown by red arrows.
2c. Fold turkey tail feather back, as shown by blue arrow.


 3. Accordion fold tail feathers, back and forth, as shown.


4. Repeat accordion folds on other side.


5. Fold body up as shown.


6a. Fold turkey body forward to center, as shown.
6b. Repeat on other side.


7. Fold turkey's head down, as shown.


8a. Fold corners of turkey body back, as shown.
8b. Fold top of tail back, as shown.


9a. Grasping tip of tail, pull down to open accordion pleats, as shown.
9b. Repeat on other side.


10. Fold bottom of body back, as shown, then glue onto Happy Thanksgiving Day card.


©2013 Tammy Yee
All rights reserved.

Thanksgiving Turkey Origami

Print and fold an Origami Turkey for Thanksgiving.


Difficulty: Easy

Directions:


1a. Cut out image along outer solid lines.
1b. Fold up on diagonal line A. Unfold.
1c. Fold down on diagonal line B. Unfold.


2a. With printed side facing up, fold up on center line c. Unfold.
2b. With printed side facing down, repeat fold on center line c. Unfold.


3a. Fan-fold turkey's tail as shown.
3b. Fold up along center crease as shown.
3c. Fold head up along diagonal folds as shown. You may tape center of fanned tail and head if desired.


Your turkey is pau (finished)! Happy Thanksgiving!

©2009 Tammy Yee
All rights reserved.

Halloween Crafts and Origami: Black Cats


Print and Fold a pair of Origami Black Cats for Halloween!

Choose a cat to print:

Happy?
Scary!


Difficulty: Easy for Children


Directions:


1. Print and cut out origami along outer solid lines.


2. Fold back diagonally as shown.


3. Turn your origami over, so that the printed side faces down.


4. Fold ear down diagonally, as shown. Repeat on other side.


5. Fold ear up as shown. Repeat on other side.


6a. Turn origami over with printed side up. Fold back white "tip" on top of cat's head.
6b. Repeat with the white corner on cat's chin.
6c. Now your cat is pau! (done)!


©2009 Tammy Yee
All rights reserved.

Halloween: Owl Mask

Great Horned Owl Mask

Difficulty: Easy


Materials:
  1. Heavyweight paper
  2. Scissors
  3. Clear paper tape

Directions:

1. Print and cut out Owl Mask:

Great Horned Owl Mask


2. Cut out holes for eyes.


3a. Overlap tab as shown and secure with tape.

3b. Repeat on other side.

3c. From the backside, you can see how the tabs overlap, and how this creates a rounded look.


4a. Crease owl beak along center fold, and secure with tape as shown.

4b. From the underside, you can see how this creates a three dimensional beak.


5. Fold in beak tabs as shown. Turn beak over.


6a. Apply tape to beak as shown...

6b. And secure to Owl Mask as shown, using the white areas on the mask as a guide.


Have a safe and Happy Halloween!


©2009 Tammy Yee
All rights reserved.


Copyright ©2009 Tammy Yee
All rights reserved. No portion of this web site may be reproduced without prior written consent.