Easy Butterfly Origami

My new book, Easy Butterfly Origami features 30 bold full-color patterns designed to accurately portray the dorsal and ventral sides of some of the most beautiful butterflies from around the world!

Origami Folding Tips

Origami, from the Japanese ori (to fold) and kami (paper), began in the 6th century when Buddhist monks introduced paper to Japan. The print-and-fold crafts and easy diagrams are designed to help children with fine motor skills, directions and hand eye coordination. Some basic origami folding tips:
  • Print and cut out patterns carefully.
  • Fold with clean, dry hands.
  • Follow the instructions. Study the diagrams and be patient.
  • Be precise: fold each crease well, flattening the creases by running your fingertip over the fold.
  • Folding the paper away from you is easier than folding towards you.
  • Be creative...use your origami on greeting cards, holiday decorations, table place cards and bookmarks.

Origami Easter Chick


Easter Chick


Difficulty: Moderate


Directions:


1a. Print and cut out origami along outer solid lines.
1b. Snip end of feet, as illustrated, to black dot.


2a. Turn paper over. With printed side facing down, fold along line A as illustrated.
2b. Repeat fold along line A on opposite side.

2c. Fold along line B.
2d. Repeat fold along line B on opposite side.


3a. Unfold along your last fold (see 2d). Your "crease" along line B is indicated by the green dashed line. Take note of line C, as indicated by the red solid line.

3b. Unfold along line A. Your origami should appear as illustrated, with the creases as marked by colored lines. (Note: Red line C is not creased yet; the line is marked for your convenience)


4a. Now fold along B line first...

4b. Then fold over along A line, all the while creasing along line C (marked in red) to create the chick's wing.
4c. Repeat above directions on the opposite side to create the other wing. Your origami should now appear as shown.


5a. Fold back along line D.
5b. Fold beak up along line E.
5c. Crease head by folding back along line F. Unfold along line F only.


6a. Fold back along center line.
6b. Crease both ways along line G by first folding forward,
6c. Then folding backward.
6d. Your origami should now have creases along line F (green) and line G (red).


7a. Simultaneously valley fold along line G (red) and mountain fold along line F (green)...
7b. So that your chick appears as shown.


8a. Valley fold along line H.
8b. Fold inward along line I on both sides to create legs.
8c. Fold feet forward, and your chick is pau (done)!


Happy Easter!

©2010 Tammy Yee
All rights reserved.

E-Card: Some Bunny Loves You

Send an E-Card for Valentine's Day or Easter!


©2011 Tammy Yee
All rights reserved.

TRAVEL: Olympic National Park, Washington


Ruby Beach, Olympic National Park. Photo by Tammy Yee.


Primeval rainforests, rugged Pacific coastline, alpine forests and glacier-capped peaks, hot springs and tide pools...Olympic National Park has much to offer as a family destination.

Whether you're spending a day or a week at the park, a stop at the Olympic National Park Visitor Center in Port Angeles will help you plan your family vacation.

Recommendation:
Falcon Guide produces a series of Best Easy Day Hikes, and we've found these useful while touring national parks, especially when we have a limited amount of time and require trails with bathroom facilities, or accommodations for family members with mobility issues.


Sea star at Salt Creek Tide Pools. Remember when visiting tide pools to always have a tide chart handy, and be sure to check ocean conditions with Park Rangers. Never turn your back to the ocean, and always keep children under close supervision. 

Rocks  may be slippery, so have proper footwear. Avoid trampling on plants and coral. Remember that tide pool creatures need to be submersed...return them to their pools, and if you lift a rock or a pebble while exploring, replace it in its original position.


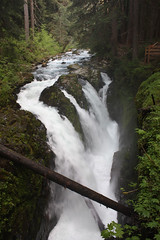
There are a number of short hikes through old-growth forest that are suitable for young families. Sol Duc Falls is a 1.4 mi (round trip) hike through mossy temperate forests. Kids can look for millipedes and banana slugs along the way.
At Olympic National Park, you can explore several different ecosystems in a single day.

We stayed in a rustic cabin at Sol Duc Hot Springs Resort, which featured two queen-sized beds, a fully equipped kitchen, refrigerator, stove, microwave and (most importantly) coffee maker.

There are no telephones, radio, television or internet connection in the cabins, so tire the kids out during the day and have quiet activities (coloring books for the little ones, cards and puzzles for older children) and books available on hand.

Barn swallows swoop over the cabins at Sol Duc Hot Springs.

The restaurant overlooks the mineral hot springs where you can unwind after a day of hiking, and the convenience store will come in handy when packing for your day trip.

Other lodging is available within the park, some without modern distractions: Lake Quinault Lodge, Kalaloch Lodge and Lake Crescent Lodge. For families who can't vacation without television and wireless internet, there's the Olympic Lodge.  For television and laundry but no internet, try the Rain Forest Resort Village. And for large families who prefer one and two bedroom suites, the Olympic Suites Inn is located within the city of Forks (tween alert: the popular Twilight series was filmed in forks!) along the Calawah River. Check for seasonal specials and make your reservations online.

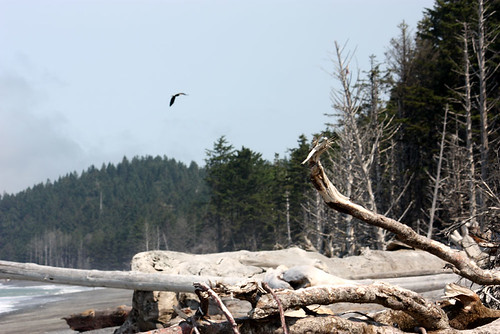
 Bald eagle over Rialto Beach

On the last day of our vacation we took a whirlwind tour, driving along the 73-mile scenic coast, stopping at Ruby Beach and Rialto Beach where we watched bald eagles soaring above the wind-sheared cliffs; took a short, family-friendly hike on snow-covered Hurricane Ridge, then explored the rich tide pools at Salt Creek, just outside the park boundaries.


Black tailed deer at Hurricane Ridge. Look for Olympic marmots, which are endemic to the Olympic Peninsula.

The Olympic National Park web site has articles and brochures you can download for children, to prepare them for your family vacation. Also, be sure to review the Park Service's Things To Know Before You Come.

Fun Facts:

Wildlife
Kids are chock full of questions you can't answer. Whenever we explore national parks, we always bring along an inexpensive pocket guide.

Our favorites are the boldly illustrated mammal, bird and plant identification guides and cards that turn hiking into a treasure hunt.

Download a list of animals you might see at Olympic National Park, and make a checklist that you can discuss after your family's day hike.

Remember that however cute and cuddly they may appear, the animals are wild and should not be approached, harassed or fed.
Pacific Northwest Marine Mammal and Seabird Word Search


Sea Otter
How much do you know about those lovable, fur-faced acrobats twisting and diving in kelp beds? Sea otters are one of the few mammals, aside from primates (monkeys and apes), to use tools. Floating on the surface of the water, they sometimes place a rock on their chest, using it as a hard surface to smash open shelled food like clams and abalone. Have you ever wondered how otters carry all that stuff to the surface? In their armpits, in loose skin folds! Try that with an urchin--better yet, don't try it.
Read more...


©2010 Tammy Yee
All rights reserved. 
Fun Stuff:

Origami
Visitors in May and early June may be lucky enough to spot a bald eagle nest with new chicks:
American Bald Eagle Origami
Bald Eagle Paper Airplane
Humpback Whale
Sea Otter


Wild About Reading

Last week I was fortunate enough to participate in the Honolulu Zoo's Wild About Reading event, featuring storytellers and crafts throughout the day. The event was organized in partnership by the Hawaii State Library, Children's Literature Hawaii and the Sheraton Hawaii Bowl and featured free books for the first 500 families, courtesy of award-winning author and illustrator James Rumford, who donated copies of his book, Chee-Lin. A great time was had by all, and I hope they make this an annual event.

In addition to reading an assortment of wildlife picture books, including Baby Honu Saves the Day, I created a coloring sheet to celebrate the day:


Origami Leprechaun for Saint Patrick's Day


Print and fold an Origami Leprechaun for Saint Patrick's Day! You can use him as a table decoration, or paste him onto cards and gifts.

Difficulty: Easy

Directions: (Follow the same directions as Cinco de Mayo doll)

1a. Print and cut out leprechaun face and pot of gold along outer solid line.
1b. Cut out leprechaun body along outer solid line.
1c. Turn leprechaun body over so that the printed side is facing down.


2a. Crease along diagonal line as shown. Unfold.
2b. Repeat crease along diagonal line on other side, as shown. Unfold.
2c. Turn origami over so that the printed side faces up.
2d. Crease down along horizontal line as shown. Unfold.


3a. With printed side facing down, carefully "tent" fold upper body forward, as shown.
3b. Fold leprechaun's legs forward, as shown.
3c. Repeat on other side.


4a. Glue head onto body.
4b. Glue pot of gold as desired.
4c. Your Leprechaun Origami doll is finished!


Happy Saint Patrick's Day!

©2011 Tammy Yee. All rights reserved. May not be reproduced or altered without consent.

St. Patrick's Day Boxes: Celtic Knots and Leprechauns

Two print and fold patterns for St. Patrick's Day boxes:


Happy St. Patrick's Day!

©2010 Tammy Yee
All rights reserved.

Saint Patrick's Day Origami Greeting


Difficulty: Easy

Directions:


1a. Print and cut out Saint Patrick's Day Greeting along outer solid lines.
1b. With printed side facing down, fold corners diagonally toward center, as shown.


2a. Turn over so that Saint Patrick's Day greeting is facing up, as shown.
2b. Fold corners diagonally toward center, as shown.


3. Fold upper right corner forward, along red line in illustration. Open up corner as shown, by pulling forward on dark green shamrock leaf.


4. Repeat with all four corners, folding forward first, then opening up corner, as shown.


Happy Saint Patrick's Day!

©2010 Tammy Yee
All rights reserved.

Saint Patrick's Day Shamrock Box


Difficulty: Easy

Directions:


1a. Print and cut out Saint Patrick's Day Shamrock box along outer solid line.
1b. Make cuts on the "shamrock halves" as shown, along the heavy black lines only. Do not cut beyond the points indicated by the red dots in the illustration.


2a - d. With printed side facing down, fold and unfold along the solid black lines as indicated, to form the sides of the box.


2e. Your shamrock box should be creased as shown.


3a-c. Repeat the process along the outer lines to form the lid of the box.
3d. Your box should now be creased as shown.


4a. Take note of the diagonal lines marked in red.


4b. As you fold the sides of the box up as shown, you will make creases along these diagonal lines to form the corners of the box.
4c. Secure the box by interlocking the shamrock halves along the cuts you made in step 1b.
 

Happy St. Patrick's Day!

©2010 Tammy Yee. All rights reserved.


Copyright ©2009 Tammy Yee
All rights reserved. No portion of this web site may be reproduced without prior written consent.