Easy Butterfly Origami

My new book, Easy Butterfly Origami features 30 bold full-color patterns designed to accurately portray the dorsal and ventral sides of some of the most beautiful butterflies from around the world!

Origami Folding Tips

Origami, from the Japanese ori (to fold) and kami (paper), began in the 6th century when Buddhist monks introduced paper to Japan. The print-and-fold crafts and easy diagrams are designed to help children with fine motor skills, directions and hand eye coordination. Some basic origami folding tips:
  • Print and cut out patterns carefully.
  • Fold with clean, dry hands.
  • Follow the instructions. Study the diagrams and be patient.
  • Be precise: fold each crease well, flattening the creases by running your fingertip over the fold.
  • Folding the paper away from you is easier than folding towards you.
  • Be creative...use your origami on greeting cards, holiday decorations, table place cards and bookmarks.

Origami: Uncle Sam

Print and fold an Easy Origami Uncle Sam for Independence Day!


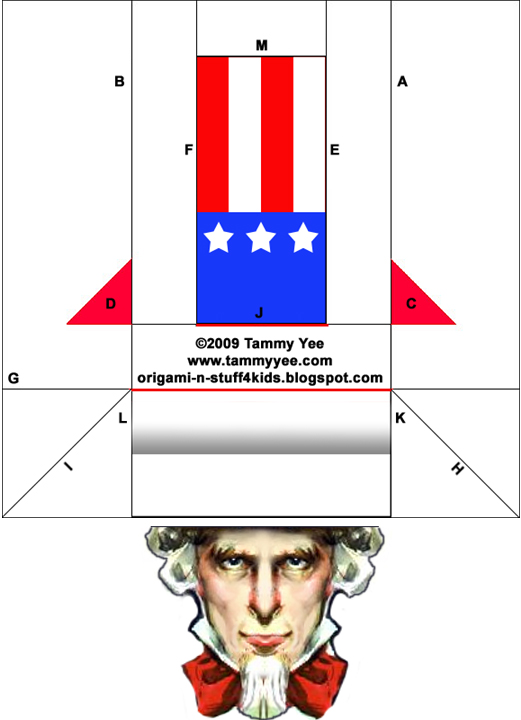
1a. Print and cut out hat origami and Sam's face.

1b. Turn your origami over, with the printed side down. Fold toward center along A.
1c. Repeat fold along B.


2a. Cut out red triangles marked C and D.
2b. Your origami, with the triangles cut out, should appear as shown.


2c. Fold along E as shown.
2d. Fold vertically along F as shown.


3a. Fold up along G.
3b. Fold diagonally on H.
3c. Fold diagonally on I.

3d. Unfold H and I. Your origami should appear as shown, with diagonal creases marked in blue.


4a. "Pull out" corner of hat brim and fold along H as shown.
4b. Repeat on other side, pulling out and folding along I as shown.

4c. Turn your origami over. It should appear as shown.


5a. Fold up along J.
5b. Fold back along L.
5c. Fold back along K.
5d. Fold back along M.


6. Glue or tape Uncle Sam's face onto his origami hat.


©2009 Tammy Yee
All rights reserved.

Crafts Around the World: Happy Canada Day Card

July 1 is Canada Day, celebrating the day in 1867 when the British North America Act created the federal government of Canada.

On the Canadian Heritage website, you can learn the motto, anthem, and official symbols of Canada.


1. Print and cut out Canada Day Card.


2. Fold horizontally, in half.


3. Fold forward, in quarters, as shown.


Print and Color the Canadian Flag:

Coloring: The U.S. Flag

Print and color the U.S. flag for Armed Forces Day (3rd Saturday in May), Memorial Day (last Monday in May),  Flag Day (June 14), Independence Day (July 4), Constitution Day (September 17), Navy Day (October 27) or Veterans Day (November 11):

Betsy Ross

You can print and color the official state flags at travel-n-stuff4kids.blogspot.com, and learn about the official state symbols.

©2010 Tammy Yee
All rights reserved.

Bald Eagle Origami

Found throughout the continent from Alaska and Canada and south to Mexico, the bald eagle is the only eagle found only in North America. Once endangered, the American bald eagle is still protected by the Migratory Bird Treaty Act and the Bald and Golden Eagle Protection Act which makes it illegal to import or export eagles and eagle parts, nests or eggs without a permit.

Revered by Native Americans, this majestic bird with its distinctive white head was adopted as the National Emblem of the United States of America on July 20, 1872. Eagles soaring high above the battlefields during the Revolutionary war were said by patriots to be "shrieking for freedom." Since then, the eagle has come to symbolize freedom.


Directions:

1a. Print your eagle origami:

1b. To fold your eagle origami, follow the same directions as the owl origami: Cut out image along outer solid lines.


2a. Fold in half along diagonal line. Unfold.
2b. Repeat the diagonal fold on other side. Unfold.
2c. Fold down along horizontal line. Unfold.


2d. Your origami should be creased as shown.


3. Carefully fold along creases, forming a "tent" as illustrated.


4a. Turn origami over.
4b. & c. Fold diagonally on both sides, as illustrated.


5a. & b. Form tail by folding diagonally on both sides, as illustrated.


Turn over. You can leave your eagle's wings open or you may fold the wings forward.Your origami eagle is ready to fly!


©2010 Tammy Yee
All rights reserved.

Origami: Boy's Day Carp, Koi Nobori

Celebrate Boy's Day (May 5) by folding a koi origami for every male in the household!

Difficulty: Medium


Koi-nobori Origami
Print a blue Koi-nobori

Koi-nobori Origami
Print a red Koi-nobori

Koi-nobori Origami
Print a green Koi-nobori


Directions:

1a. Print and cut out origami along outer solid lines.
1b. Snip end of tale, as illustrated, to black dot.

Koi-nobori Origami


2a. Turn paper over. With printed side facing down, fold along line A as shown.
2b. Repeat fold along line B.
2c. Fold up along line C.
2d. Fold up along line D.

Koi-nobori Origami


3a. Fold in half, along diagonal line, as shown.
3b. Your origami should look like this, with a "tail" flap and a "head" flap.

Koi-nobori Origami


4a. Unfold "tail" flap. Take note of the diagonal line, highlighted here in red, on the carp's fin.
4b. Folding "tail" flap first, crease carp's fin along the highlighted line as you fold "head" flap over.
4c. Your origami should now look like this, with the fin folded as shown.

Koi-nobori Origami


5a. "Valley" fold origami tip inward along line E as shown.
5b. Fold fin up along slit. Your Koi Nobori is done!

Koi-nobori Origami


©2009 Tammy Yee. All rights reserved. May not be reproduced without author's consent.

Crafts: Boy's Day Kite, Koi Nobori

Make a Koi Nobori, a Boy's Day carp kite on May 5th. Traditionally, a koi is flown for every male in the household, with the largest carp on the top representing the father.


Directions
1. Select your koi, print, and cut along outline.

2. Fold your koi in half along the vertical line, and glue along top, leaving the "mouth" open.

3. Use a hole puncher to punch holes to either side of the mouth, and attach strings.


©2009 Tammy Yee. All rights reserved. Do not reproduce or alter without author's consent.

Some Bunny Loves You Box


Difficulty: Easy

Directions:

1. Print and cut out Bunny Loves You Box along solid lines, including tabs. 
2. Fold along dashed lines.
3. Glue tabs, using sample illustration as a guide.


©2010 Tammy Yee
All rights reserved


Copyright ©2009 Tammy Yee
All rights reserved. No portion of this web site may be reproduced without prior written consent.