Classic Pinwheel for your pencil eraser.
Not suitable for young children.
 Difficulty: Easy
Materials:
- Paper
- Scissors
- Sewing pin
- Pencil with eraser head
Directions:
1.
Print and cut out web and spider.

2. Cut pinwheel web along diagonal
red lines.
3. Using the photo as a guide, push the
sewing pin first through the
red dot on spider, then through the dots on the paper pinwheel. Insert pin into eraser head.
(Not suitable for young children.)
Have a safe and happy Halloween!
©2009
Tammy Yee
All rights reserved.
Add Post To: |
Digg|
Technorati|
Tip'd|
del.icio.us|
Stumbleupon|
Reddit|
BlinkList|
Furl|
Spurl|
Yahoo|
Simpy|
Need tiny boxes for Holiday treats? Kids love helping with favors and decorations. Here's an activity you can work on together...printing and folding Holiday-themed boxes to hold candy kisses, peppermints and more...
Directions:
1a. Cut out box along outer solid line.
1b. Make cuts on the "shamrock halves" as shown, along the black lines only. Do not cut beyond the points indicated by the red dots.

2a - d. With printed side facing down, fold and unfold along the solid black lines as indicated, to form the sides of the box.
| 2e. Your box should be creased as shown: |  |
3a-c. Repeat the process along the outer lines to form the lid of the box.
| 3d. Your box should now be creased as shown: |  |
| 4a. Take note of the diagonal lines marked in red: |  |
4b. As you fold the sides of the box up as shown, you will make creases along these diagonal lines to form the corners of the box.
4c. Secure the box by interlocking the shamrock halves along the cuts you made in step 1b. |  |
Print St. Patrick's Day Box
Print Easter Chick Box
Print Halloween Box
©2009 Tammy Yee. All rights reserved.
Add Post To: |
Digg|
Technorati|
Tip'd|
del.icio.us|
Stumbleupon|
Reddit|
BlinkList|
Furl|
Spurl|
Yahoo|
Simpy|
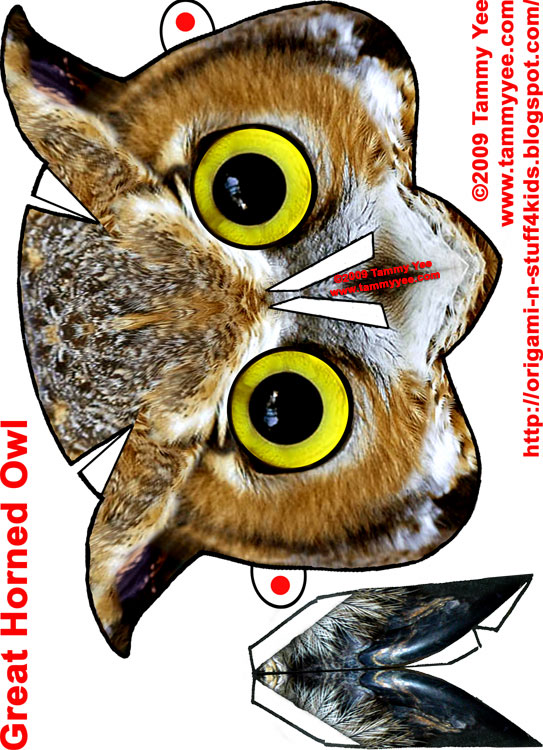
Great Horned Owl Mask
Difficulty: Easy
 Materials:
- Heavyweight paper
- Scissors
- Clear paper tape
Directions:
1.
Print and cut out Owl Mask:

2. Cut out holes for eyes.

3a. Overlap tab as shown and secure with tape.

3b. Repeat on other side.

3c. From the backside, you can see how the tabs overlap, and how this creates a rounded look.

4a. Crease owl beak along center fold, and secure with tape as shown.

4b. From the underside, you can see how this creates a three dimensional beak.

5. Fold in beak tabs as shown. Turn beak over.


6a. Apply tape to beak as shown...

6b. And secure to Owl Mask as shown, using the white areas on the mask as a guide.

Have a safe and Happy Halloween!
©2009
Tammy Yee
All rights reserved.
Add Post To: |
Digg|
Technorati|
Tip'd|
del.icio.us|
Stumbleupon|
Reddit|
BlinkList|
Furl|
Spurl|
Yahoo|
Simpy|
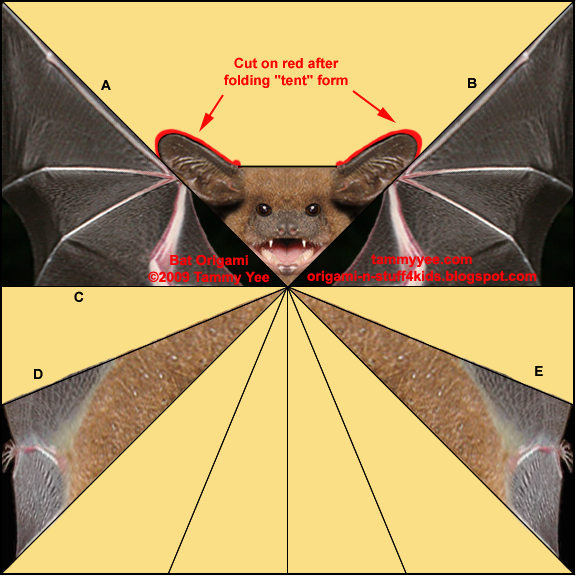
Print and fold an Origami Bat for Halloween! Create your own Halloween cards and window decorations.
 Difficulty: Easy
Directions:
1.
Print and cut out Bat Origami.

2. Fold back on diagonal line A. Unfold.
3. Repeat fold on diagonal line B. Unfold.


4. Fold up on line C. Unfold.

5. Your Bat Origami should be creased as shown:

6a. Using the creases as guidelines, create a "tent" form as shown.
6b. Cut bat ears along red lines, as shown.

7. Fold bat head down.

8. Fold along D, and E, to form your Origami Bat's body.


Have a safe and Happy Halloween!
©2009 Tammy Yee
www.tammyyee.com
All rights reserved.
Add Post To: |
Digg|
Technorati|
Tip'd|
del.icio.us|
Stumbleupon|
Reddit|
BlinkList|
Furl|
Spurl|
Yahoo|
Simpy|
Copyright ©2009 Tammy Yee
All rights reserved. No portion of this web site may be reproduced without prior written consent.


