Easy Butterfly Origami

My new book, Easy Butterfly Origami features 30 bold full-color patterns designed to accurately portray the dorsal and ventral sides of some of the most beautiful butterflies from around the world!

Origami Folding Tips

Origami, from the Japanese ori (to fold) and kami (paper), began in the 6th century when Buddhist monks introduced paper to Japan. The print-and-fold crafts and easy diagrams are designed to help children with fine motor skills, directions and hand eye coordination. Some basic origami folding tips:
  • Print and cut out patterns carefully.
  • Fold with clean, dry hands.
  • Follow the instructions. Study the diagrams and be patient.
  • Be precise: fold each crease well, flattening the creases by running your fingertip over the fold.
  • Folding the paper away from you is easier than folding towards you.
  • Be creative...use your origami on greeting cards, holiday decorations, table place cards and bookmarks.
Showing posts with label animals. Show all posts

Halloween: Origami Bat 1

Print and fold an Origami Bat for Halloween! Create your own Halloween cards and window decorations.


Difficulty: Easy

Directions:


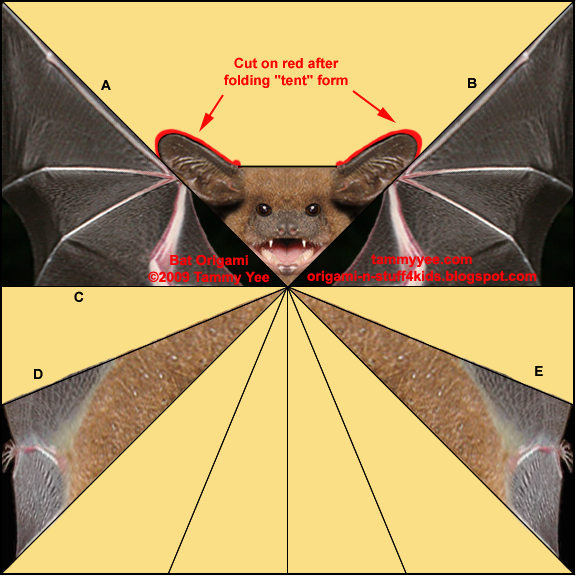
1. Print and cut out Bat Origami.


2. Fold back on diagonal line A. Unfold.
3. Repeat fold on diagonal line B. Unfold.


4. Fold up on line C. Unfold.


5. Your Bat Origami should be creased as shown:


6a. Using the creases as guidelines, create a "tent" form as shown.
6b. Cut bat ears along red lines, as shown.


7. Fold bat head down.


8. Fold along D, and E, to form your Origami Bat's body.


Have a safe and Happy Halloween!


©2009 Tammy Yee
www.tammyyee.com

All rights reserved.

Battty for Bats: 10 Essential Bat Facts, Plus Photo Gallery!

How much do you know about these misunderstood mammals? Check out Bats: 10 Essential Bat Facts, Plus Photo Gallery! by Rhishja Larson:

"Bats may be considered a spooky Halloween mascot, but they are actually one of the most beneficial animals on the planet: 70% of the world’s bat species feed on insects - and one bat can consume up to 1,000 insect pests in an hour. Bats also play a critical role in pollination and seed dispersal.

Despite the fact that bats occur nearly everywhere on earth (except for arctic and desert extremes), 60 species of bats are listed as endangered. And in the U.S., an estimated million or more hibernating bats of six species have been killed by White-nose Syndrome (WNS) in nine states since 2006."


Click on the photo of the white-shouldered bat to read Rhishja's full article, view her slideshow, and learn 10 fascinating facts about bats!


Print and fold an origami bat here:

Origami Bunnies

Four bunnies to fold! Happy Easter!


Difficulty: Easy


Directions:

Choose and Print Your Bunny:


1a. Cut out origami along outer solid lines.
1b. Fold in half along diagonal line A.


2a. Fold bunny's head back along line B.
2b. Turn your bunny over so that the printed side is facing up.


3a. Fold back along line C.
3b. Fold back along line D.
3c. Fold back along line E.

Your Origami Bunny is ready to hop!


©2010 Tammy Yee
All rights reserved. 

Origami Bunny Face

A simple bunny...great for pasting on Happy New Year cards!


Difficulty: Easy

Directions:


1. Print and cut out image along outer solid lines.
2. Fold back along diagonal line.
3. Turn your bunny origami over, so that the printed side faces down.


4a. Fold ear down on diagonal line as shown.
4b. Repeat on other side.


5a. Fold ear up as shown.
5b. Repeat on other side.


6a. Turn bunny over with printed side up.
6b. Fold back white "tip" on top of bunny's head.
6c. Repeat with the white corner on bunny's chin. Fold back bunny's cheeks, as illustrated. Now your bunny is pau! (done)!


©2010 Tammy Yee
All rights reserved.

Origami Easter Chick


Easter Chick


Difficulty: Moderate


Directions:


1a. Print and cut out origami along outer solid lines.
1b. Snip end of feet, as illustrated, to black dot.


2a. Turn paper over. With printed side facing down, fold along line A as illustrated.
2b. Repeat fold along line A on opposite side.

2c. Fold along line B.
2d. Repeat fold along line B on opposite side.


3a. Unfold along your last fold (see 2d). Your "crease" along line B is indicated by the green dashed line. Take note of line C, as indicated by the red solid line.

3b. Unfold along line A. Your origami should appear as illustrated, with the creases as marked by colored lines. (Note: Red line C is not creased yet; the line is marked for your convenience)


4a. Now fold along B line first...

4b. Then fold over along A line, all the while creasing along line C (marked in red) to create the chick's wing.
4c. Repeat above directions on the opposite side to create the other wing. Your origami should now appear as shown.


5a. Fold back along line D.
5b. Fold beak up along line E.
5c. Crease head by folding back along line F. Unfold along line F only.


6a. Fold back along center line.
6b. Crease both ways along line G by first folding forward,
6c. Then folding backward.
6d. Your origami should now have creases along line F (green) and line G (red).


7a. Simultaneously valley fold along line G (red) and mountain fold along line F (green)...
7b. So that your chick appears as shown.


8a. Valley fold along line H.
8b. Fold inward along line I on both sides to create legs.
8c. Fold feet forward, and your chick is pau (done)!


Happy Easter!

©2010 Tammy Yee
All rights reserved.


Copyright ©2009 Tammy Yee
All rights reserved. No portion of this web site may be reproduced without prior written consent.